The graphical User-Interface
A portable GUI to easily transfer cross-link data files and help users focusing on experimental work is the main idea behind CroCo. However, usage of the modules inside Python-scripts is possible (and documented at Functions documentation for read functions and Functions documentation for write functions).
General usage
- Download the compiled GUI from https://github.com/cschmidtlab/CroCo/releases/latest
- If your OS is not supported you can still try Starting the CroCo GUI from Python.
- Start the programme
- If Windows complains about the non-verified origin of the programme, acknowledge and continue
- You should see something like the following
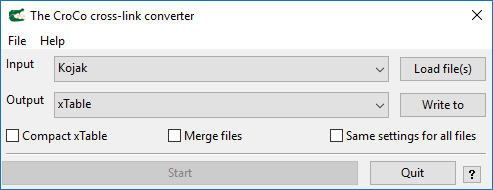
The CroCo GUI
- In the
InputandOutputdropdown menus, choose a format and select a directory or one or multiple files.
- the Start button will only be available once both formats are set and files are selected
- If you selected multiple files for input you can use the
Merge filesandSame settings for all filescheckboxes
Same settings for all fileslets you chose only one set of options (e.g. necessary additional files) that will be used for all files. If the box is unchecked, you will get a separate prompt for each file selected.Merge filesconcatenates the tables for all selected files and generates the output from the concatenated table- CroCo transfers all information found in the input files into the generated xTable files. If you want to restrict the xTable headers to the minimum columns necessary, you can choose
Compact xTable- Click on
Start
- Depending on your choice of input and output formats, CroCo may require additional information. Therefore a second window may pop up.
- Detailed information on how to enter format-specific information can be found at Functions documentation for read functions and Functions documentation for write functions.
Starting the CroCo GUI from Python
- Clone the CroCo repository from https://github.com/cschmidtlab/CroCo.git
- If you’re not familiar with github, download and extract the latest version of the CroCo source code from https://github.com/cschmidtlab/CroCo/archive/master.zip
- Install Python 3+
- The easiest way is usually to use anaconda Python (https://www.anaconda.com/distribution/)
- Install the required python packages for CroCo (see requirements.txt in the CroCo root directory) either via
pip install PACKAGEor viaconda install PACKAGE
- Open a Python-aware command-line
- On Windows, use Anaconda Prompt or cmd.exe if you exported Python to your OS PATH-Variable
- Navigate to
CroCo/src- Start the GUI by typing
python croco_wx.py
